| Service Application | Foundation | Standard | Enterprise | Online |
|---|---|---|---|---|
| Access Services | No | No | Yes | Yes |
| Access Services 2010 | No | No | Yes | No |
| Apps Management Service | Yes | Yes | Yes | Yes |
| Business Data Connectivity Service | Yes | Yes | Yes | Yes |
| Excel Services application | No | No | Yes | Yes |
| Machine Translation Service | No | No | Yes | Yes |
| PerformancePoint Service Application | No | No | Yes | No |
| PowerPoint Automation Service | No | Yes | Yes | Yes |
| Managed Metadata Service Application | Yes | Yes | Yes | Yes |
| Secure Store Service Application | No | Yes | Yes | Yes |
| Search Service Application | Yes* | Yes | Yes | Yes |
| State Service Application | Yes | Yes | Yes | Yes |
| UserProfile Service Application | No | Yes | Yes | Yes |
| Visio Graphics Service | No | No | Yes | Yes |
| Word Automation Services | No | Yes | Yes | Yes |
| Workflow Management Service Application | Yes | Yes | Yes | Yes |
| Work Management Service Application | No | Yes | Yes | Yes |
| Site Subscription Settings Services | Yes | Yes | Yes | Yes |
| UserAndHealth Data Services | Yes | Yes | Yes | Yes |
Monday, July 25, 2016
SharePoint 2013 Service Application comparison of each editions
SharePoint 2013 Insights comparison of each editions
| Insights features | Foundation | Standard CAL | Enterprise CAL | Online |
|---|---|---|---|---|
| Business Intelligence Center | No | No | Yes | TBA |
| Calculated Measures and Members | No | No | Yes | TBA |
| Data Connection Library | No | No | Yes | TBA |
| Decoupled PivotTables and PivotCharts | No | No | Yes | TBA |
| Excel Services | No | No | Yes | Yes |
| Field list and Field Support | No | No | Yes | TBA |
| Filter Enhancements | No | No | Yes | TBA |
| Filter Search | No | No | Yes | TBA |
| PerformancePoint Services | No | No | Yes | TBA |
| PerformancePoint Services (PPS) Dashboard Migration | No | No | Yes | TBA |
| Power View for Excel in SharePoint | No | No | Yes | TBA |
| Power Pivot for Excel in SharePoint | No | No | Yes | TBA |
| Quick Explore | No | No | Yes | TBA |
| Scorecards & Dashboards | No | No | Yes | TBA |
| SQL Server Reporting Services (SSRS) Integrated Mode | Yes | Yes | Yes | TBA |
| Timeline Slicer | No | No | Yes | TBA |
| Visio Service | No | No | Yes | TBA |
Sunday, June 12, 2016
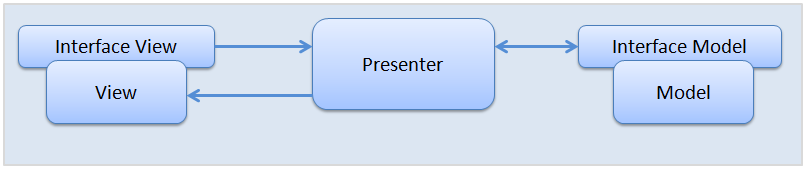
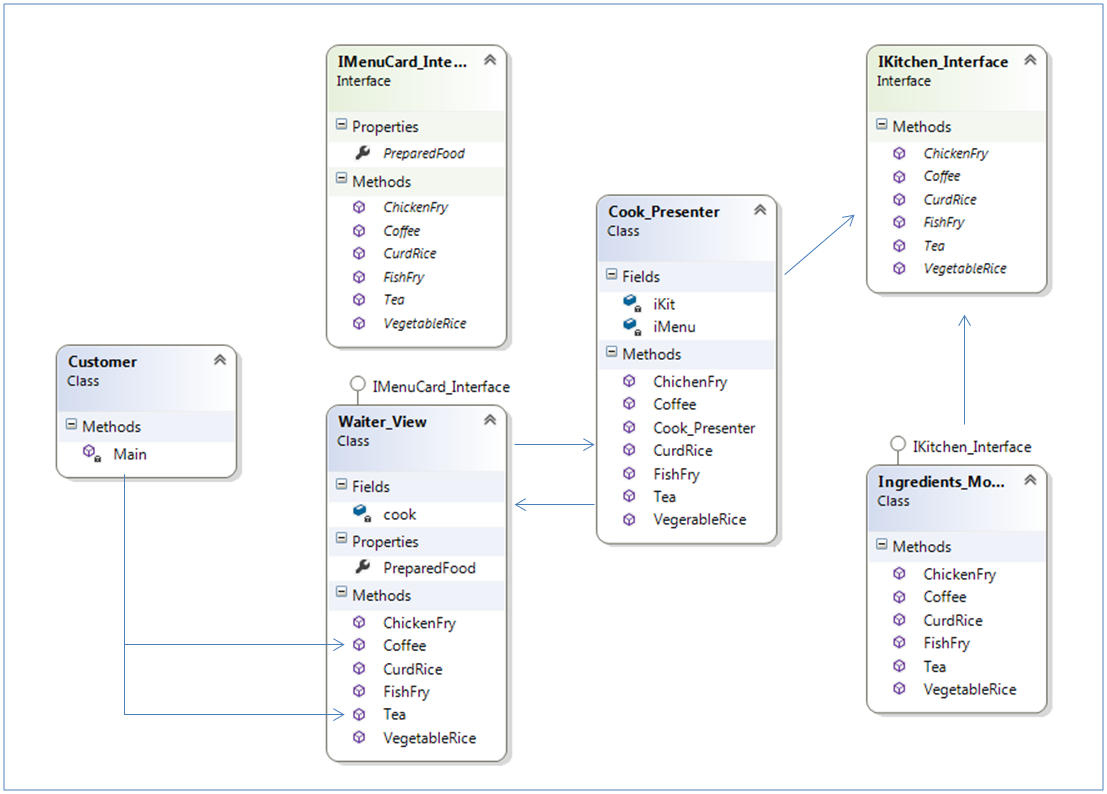
Model-View-Presenter (MVP) Pattern
MVP: Model - View - Presenter
I thought of writing something about MVP design pattern which is one of the major pattern used in SharePoint and many .Net applications.
Most of the time reader(s) feels that it is easy when reading article but during implementation there will be lot of confusion and forget how it works internally. I had created a easy example with a day to day life which will give a very clear understating and implementation knowledge.
Before I proceed to the example, we should know some basic definition used for MVP.
MVP design pattern is evaluation of MVC. MVP pattern providing a clear separation between view, model and controller. As well as improves the the testability of enterprise solution.
MVP pattern is adding more benefit to decoupling architecture. The model can be used by more than one applications/operations.
Model: It is a domain level or business object. Model accommodates application data and behaviours to systematically access it. Model should be independent and it should not be communicated directly from either View or Presenter. All the time model will be treated as stand alone build business object which can be interacted through an interface.
View: View is nothing but UI where all data/result will be bound. But view should be updated by presenter. View will know the model but not wise versa.
Presenter: Presenter will address all input from view and use them to manipulate the result through Model and update the result back to view.
Below is the example that I created with Restaurant operation with MVP.
Actions: Customer going to an restaurant for having some food. Waiter will get the order from customer and pass it to kitchen department. Cook will get all input and prepare the food for the order and deliver the food.
Find below the mapping how this action and characters are associated with MVP architecture/elements.
Customer --> End user
Ingredients--> Model: Place of providing data/manipulating result with help of business logic. Here in this context the kitchen is source for supplying ingredients for preparing food.
Waiter --> View: Read out the menu items and get order from customer
Cook --> Presenter: The one who collect input from waiter and prepare food based on the order and deliver the food back to waiter who will serve to customer.
Menu card --> View Interface : Waiter should know all available items and way of serving the food which is nothing but implementing the interface in view.
Kitchen --> Model Interface:
Kitchen Interface --> Model Interface: Kitchen is the place which provide a facility to prepare food by accessing all ingredients and cooking equipments by cook.
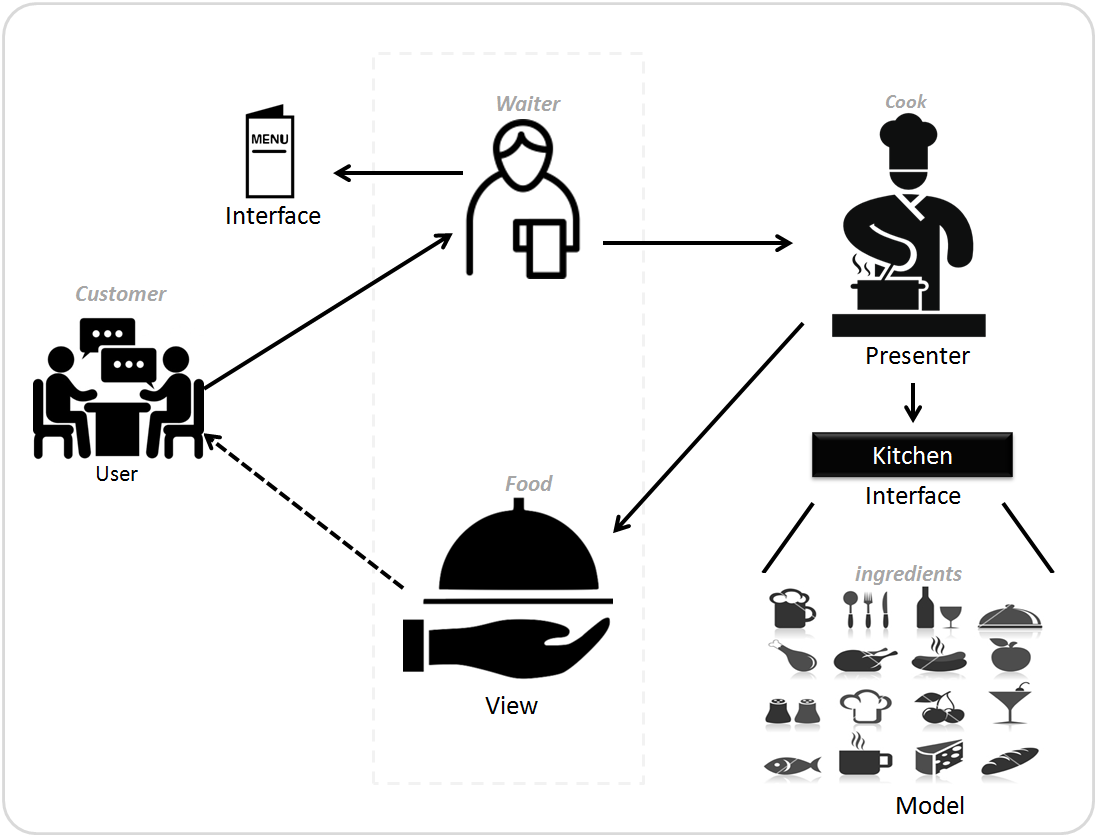
Logical diagram of MVP pattern association with Restaurant operation.
- As stated in above diagrams, waiter(view) should knows all available food by implementing the food menu which is nothing but and View interface
- Waiter can communicate the customer order to cook for preparing food but cannot go to kitchen and prepare food himself.
- Cook will completely read the order details and access kitchen to get all ingredients and equipments for preparing food
- Kitchen is an model interface because it is the place providing facility for preparing food.
- Ingredients is our mode as it is similar to information data. This model can be accessed by PO department, Stack department and many more.
- Cook will prepare food and deliver it on a plate or cup based on order. This action is nothing but presenter updating the view with result which will be deliver to end user(customer)
Transforming the logic in below diagram
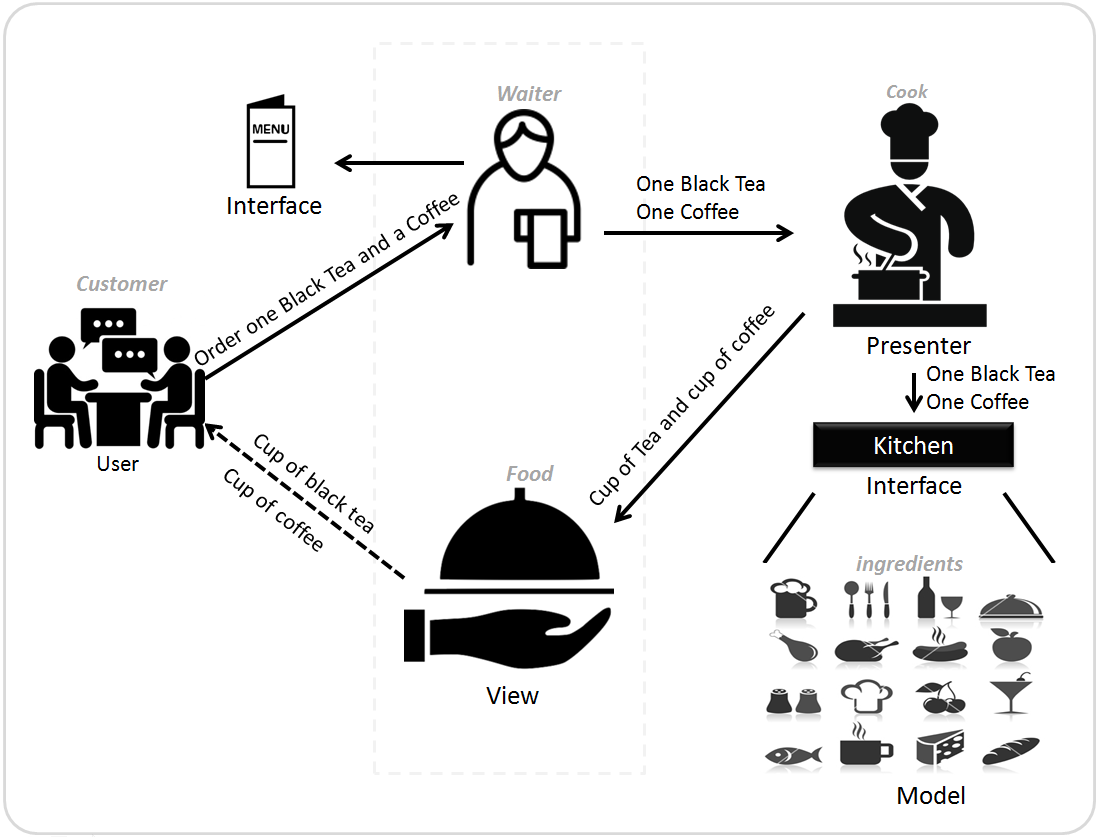
- Waiter reading all items available in menu card
- Customer ordering one black tea and cup of coffee to waiter
- Waiter sending order details to cook for preparing black tea and coffee
- Cook access kitchen and collect coffee seed, Tea powder and milk for preparing food.
- Cook complete the preparation and pouring it in two different cups. One for black tea another one for coffee.
- Waiter serve the black team and coffee to respective customer.
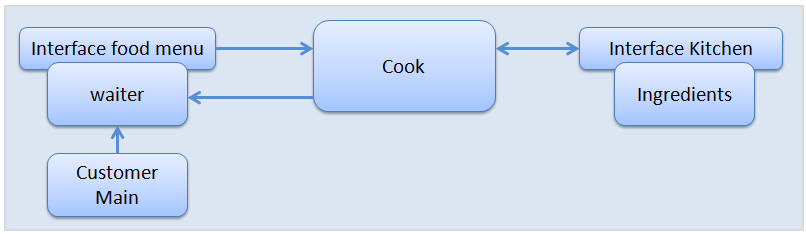
Find below completely transformed class diagram
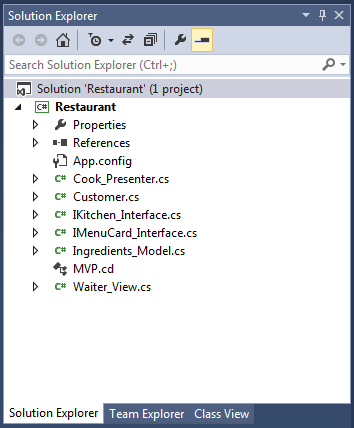
Sample C# solution explorer
Sample code:
Model:
namespace Restaurant
{
public class Ingredients_Model : IKitchen_Interface
{
public string VegetableRice(int qty)
{
return "Ready :- "+qty + " --> Vegetable Rice.";
}
public string CurdRice(int qty)
{
return "Ready :- " + qty + " --> Curd Rice ";
}
public string Tea(string density, bool withMilk)
{
if (withMilk)
{
return "Ready :- " + density + " --> Tea with Milk ";
}
else
{
return "Ready :- " + density + " --> tea without Milk ";
}
}
public string Coffee(string density, bool withMilk)
{
if (withMilk)
{
return "Ready :- " + density + " --> coffee with Milk ";
}
else
{
return "Ready :- " + density + " --> coffee without Milk ";
}
}
public string FishFry(string fishName, int qty)
{
return "Ready :- " + qty + " --> Fried " + fishName + " fish ";
}
public string ChickenFry(int qty)
{
return "Ready :- " + qty + " --> Fried chicken ";
}
}
}
Model Interface:
namespace Restaurant
{
public interface IKitchen_Interface
{
string VegetableRice(int qty);
string CurdRice(int qty);
string Tea(string density,bool withMilk);
string Coffee(string density, bool withMilk);
string FishFry(string fishName,int qty);
string ChickenFry(int qty);
}
}
Presenter:
namespace Restaurant
{
public class Cook_Presenter
{
IMenuCard_Interface iMenu;
IKitchen_Interface iKit;
public Cook_Presenter(IMenuCard_Interface pImenu)
{
iMenu = pImenu;
iKit = new Ingredients_Model();
}
public void FishFry(string fishName,int qty)
{
iMenu.PreparedFood=iKit.FishFry(fishName,qty);
}
public void ChichenFry(int qty)
{
iMenu.PreparedFood = iKit.ChickenFry( qty);
}
public void CurdRice(int qty)
{
iMenu.PreparedFood = iKit.CurdRice( qty);
}
public void VegerableRice(int qty)
{
iMenu.PreparedFood = iKit.VegetableRice( qty);
}
public void Tea(string dencity, bool withMilk)
{
iMenu.PreparedFood = iKit.Tea(dencity, withMilk);
}
public void Coffee(string dencity, bool withMilk)
{
iMenu.PreparedFood = iKit.Coffee(dencity, withMilk);
}
}
}
View Interface;
namespace Restaurant
{
public interface IMenuCard_Interface
{
void FishFry(string fishName,int qty);
void ChickenFry(int qty);
void Coffee(string dencity, bool withMilk);
void Tea(string dencity, bool withMilk);
void CurdRice(int qty);
void VegetableRice(int qty);
string PreparedFood { get; set; }
}
}
View:
namespace Restaurant
{
public class Waiter_View:IMenuCard_Interface
{
Cook_Presenter cook;
public void FishFry(string fishName, int qty)
{
cook=new Cook_Presenter(this);
cook.FishFry(fishName, qty);
}
public string PreparedFood
{
get;
set;
}
public void ChickenFry(int qty)
{
cook = new Cook_Presenter(this);
cook.ChichenFry(qty);
}
public void Coffee(string dencity, bool withMilk)
{
cook = new Cook_Presenter(this);
cook.Coffee(dencity, withMilk);
}
public void Tea(string dencity, bool withMilk)
{
cook = new Cook_Presenter(this);
cook.Tea(dencity, withMilk);
}
public void CurdRice(int qty)
{
cook = new Cook_Presenter(this);
cook.CurdRice( qty);
}
public void VegetableRice(int qty)
{
cook = new Cook_Presenter(this);
cook.VegerableRice( qty);
}
}
}
Customer:
using System;
namespace Restaurant
{
class Customer
{
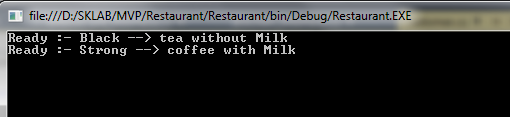
static void Main(string[] args)
{
Waiter_View order = new Waiter_View();
order.Tea("Black", false);
Console.WriteLine(order.PreparedFood);
order.Coffee("Strong", true);
Console.WriteLine(order.PreparedFood);
Console.ReadKey(true);
}
}
}
RESULT:
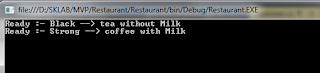
RESULT:
Tuesday, May 31, 2016
Creating A Service With $http using AngularJS
AngularJS is providing lot of extraordinary build in feature. One among many feature is creating a custom service.
We can have an custom service which can be reused in many controllers.
In below sample I had created a common service for $http and displaying responses from different controllers.
URL is passed as dynamic input parameter to the service and the service will send response back to the controller. The code is mode easy and self explanatory.
HTML Example:
<!DOCTYPE html>
<html xmlns="http://www.w3.org/1999/xhtml">
<head>
<title></title>
<script src="Scripts/angular.js"></script>
<script src="Scripts/httpFactory.js"></script>
</head>
<body ng-app="skMain">
<div ng-controller="skCtrl1">
VALID HTML RESPONSE DATA : {{mydata}}
</div>
<br/>
<div ng-controller="skCtrl2">
INVALID HTML RESPONSE DATA : {{getResponse}}
</div>
</body>
</html>
AngularJS Example
///
//Angulare module
var skMain = angular.module("skMain", []);
//Declaring controller
skMain.controller("skCtrl1", skCtrl1);
skMain.controller("skCtrl2", skCtrl2);
//declaring service/factory
skMain.factory("httpFact",httpFact);
//Controller has farctoy injected
function skCtrl1($scope, httpFact) {
//Get http response from factory for valid HTML page
httpFact.getData("httpFactory.html")
.then(
function (response) {
//getting success response
$scope.mydata = "Success --> httpFactory.html : status"
+ response.status + " " + response.statusText;
console.log(response);
},
function (response) {
//getting failure response
$scope.mydata = "Failed --> httpFactory.html : status"
+ response.status + " " + response.statusText;
});
}
//Controller has farctoy injected
function skCtrl2($scope, httpFact) {
//Get http response from factory for valid HTML page
httpFact.getData("httpFactory1.html")
.then(
function (response) {
//getting success response
$scope.getResponse = "Success --> httpFactory.html : status"
+ response.status + " " + response.statusText;
},
function (response) {
//getting failure response
$scope.getResponse = "Failed --> httpFactory.html : status"
+ response.status + " " + response.statusText;
console.log(response);
});
}
//Defining factory method. getDate will be returned as http response
function httpFact($http) {
return {
getData: function(myUrl) {
return $http({
method: "GET",
url: myUrl
});
}
}
}
Result:
VALID HTML RESPONSE DATA : Success --> httpFactory.html : status 200 OK
INVALID HTML RESPONSE DATA : Failed --> httpFactory.html : status 404 Not Found
We can have an custom service which can be reused in many controllers.
In below sample I had created a common service for $http and displaying responses from different controllers.
URL is passed as dynamic input parameter to the service and the service will send response back to the controller. The code is mode easy and self explanatory.
HTML Example:
<!DOCTYPE html>
<html xmlns="http://www.w3.org/1999/xhtml">
<head>
<title></title>
<script src="Scripts/angular.js"></script>
<script src="Scripts/httpFactory.js"></script>
</head>
<body ng-app="skMain">
<div ng-controller="skCtrl1">
VALID HTML RESPONSE DATA : {{mydata}}
</div>
<br/>
<div ng-controller="skCtrl2">
INVALID HTML RESPONSE DATA : {{getResponse}}
</div>
</body>
</html>
Saved above html name " httpFactory.html"
AngularJS Example
///
//Angulare module
var skMain = angular.module("skMain", []);
//Declaring controller
skMain.controller("skCtrl1", skCtrl1);
skMain.controller("skCtrl2", skCtrl2);
//declaring service/factory
skMain.factory("httpFact",httpFact);
//Controller has farctoy injected
function skCtrl1($scope, httpFact) {
//Get http response from factory for valid HTML page
httpFact.getData("httpFactory.html")
.then(
function (response) {
//getting success response
$scope.mydata = "Success --> httpFactory.html : status"
+ response.status + " " + response.statusText;
console.log(response);
},
function (response) {
//getting failure response
$scope.mydata = "Failed --> httpFactory.html : status"
+ response.status + " " + response.statusText;
});
}
//Controller has farctoy injected
function skCtrl2($scope, httpFact) {
//Get http response from factory for valid HTML page
httpFact.getData("httpFactory1.html")
.then(
function (response) {
//getting success response
$scope.getResponse = "Success --> httpFactory.html : status"
+ response.status + " " + response.statusText;
},
function (response) {
//getting failure response
$scope.getResponse = "Failed --> httpFactory.html : status"
+ response.status + " " + response.statusText;
console.log(response);
});
}
//Defining factory method. getDate will be returned as http response
function httpFact($http) {
return {
getData: function(myUrl) {
return $http({
method: "GET",
url: myUrl
});
}
}
}
Result:
VALID HTML RESPONSE DATA : Success --> httpFactory.html : status 200 OK
INVALID HTML RESPONSE DATA : Failed --> httpFactory.html : status 404 Not Found
Saturday, May 21, 2016
Get App Web and Host Web URL using jQuery
Find below the code sample of jQuery to get App Web and Host web URL.
$(document).ready(function(){
var spHostWebUrl=decodeURIComponent(getQueryStringValue("SPHostUrl"));
var spAppWebUrl=decodeURIComponent(getQueryStringValue("SPAppWebUrl"));
console.log("Host web URL :"+spHostWebUrl);
console.log("App web URL :"+spAppWebUrl);
});
function getQueryStringValue(paramName){
var params=document.URL.split("?")[1].split("&");
for(var intx=0;intx<params.length;intx++){
var urlParam=params[intx].split("=");
if(urlParam[0]==paramName){
return urlParam[1];
}
}
}
Friday, April 29, 2016
Create app catalog site in SharePoint online
SharePoint online will accept only one app catalog per tenant. Once the app catalog is created then all sites and site collection will use the same for apps management.
Find below the steps to create app catalog in existing SharePoint online site.
- Login http://portal.office.com
- Go to SharePoint Admin Center
- Click on Apps available in quick launch
- Click on app catalog present at right hand side(work space)

5. Selection create new app catalog site option

6. Click on OK button
7. Enter new app catalog site details(similar to new site collection creations process)
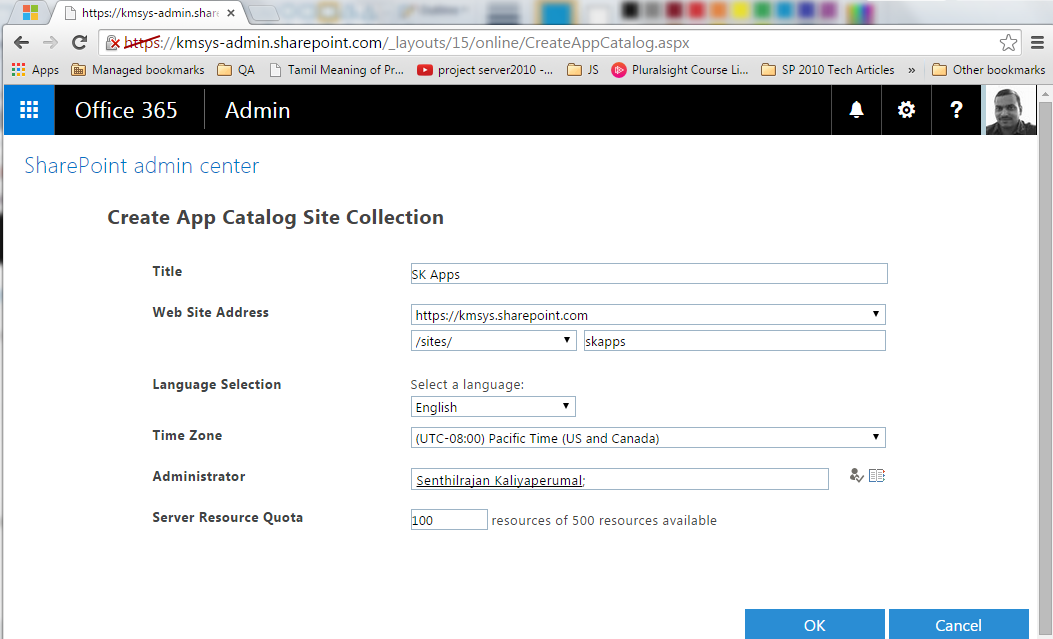
8. Click on OK button
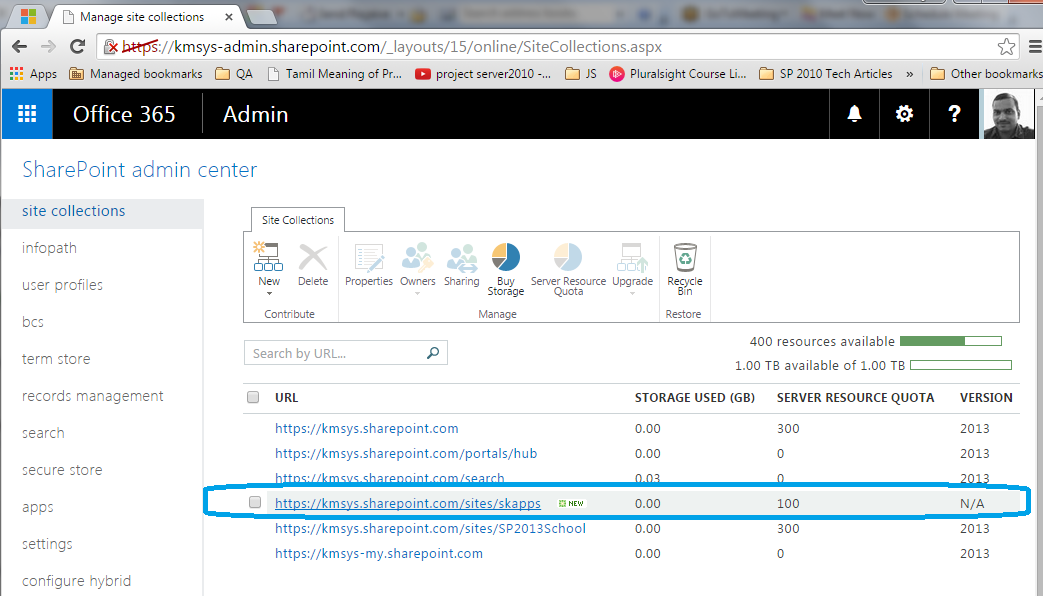
9. SharePoint online will take few minutes to process and provision app catalog site

10. New app catalog site is available in site collection list
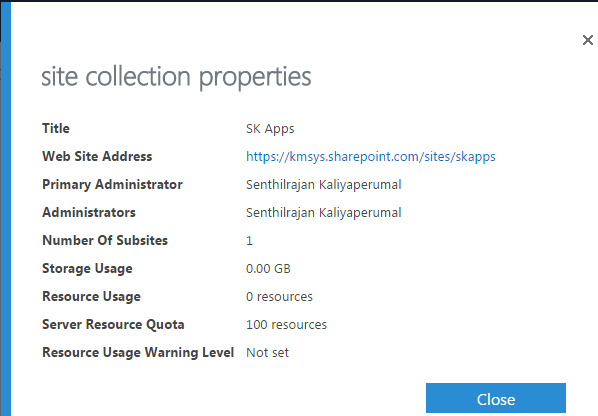
11. Click app catalog site url to see the properties
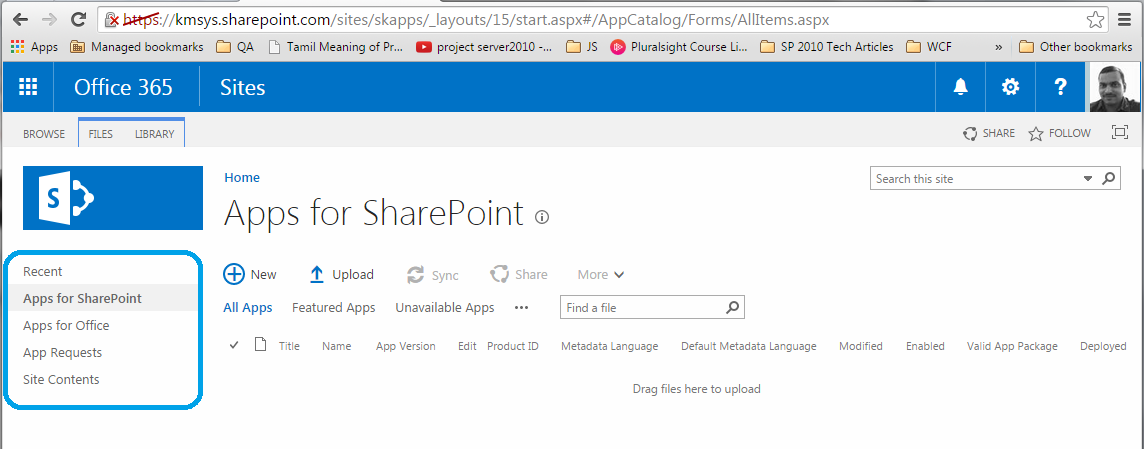
12. Click on web address to see newly create app catalog site
13. New app catalog site loaded
14. Find different type options to import apps to your tenant
Thursday, April 28, 2016
Create New Site Collection in SharePoint Online
Create new site collection in SharePoint online
Microsoft gives a sophisticated environment for maintaining all content at one place and make it available online all the time. SharePoint online is part of Office 365 suite. If you have SharePoint subscriptions enabled then you are allowed to create new site collections.
Find below the steps to create new site collection SharePoint online.
1. Login to http://portal.office.com
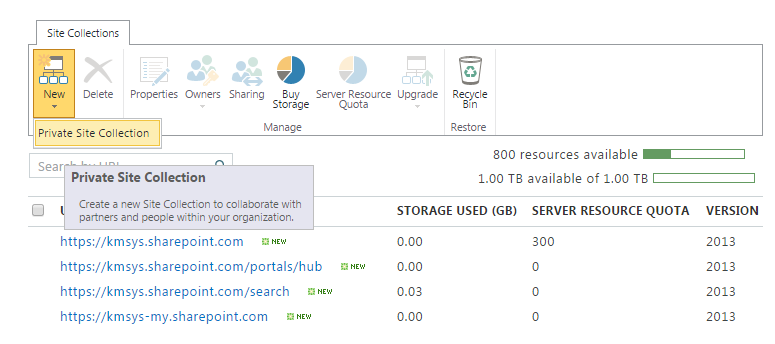
2. Once landed in Office 365, go to Admin Center and click on SharePoint
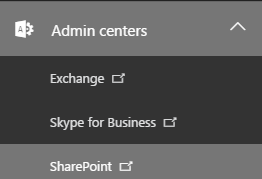
3. Once landed in SharePoint Admin center, click on New Private site collection
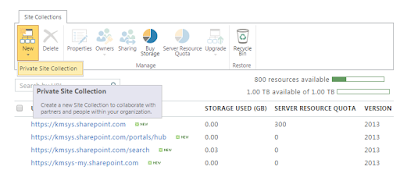
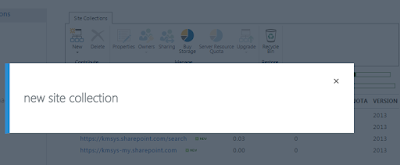
4. SharePoint begins with creating site collection input form
5. Enter the new site collection details as required
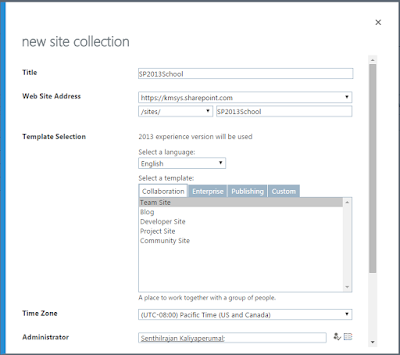
6. Enter the site collection administrator's name/id
7.Click on OK Button
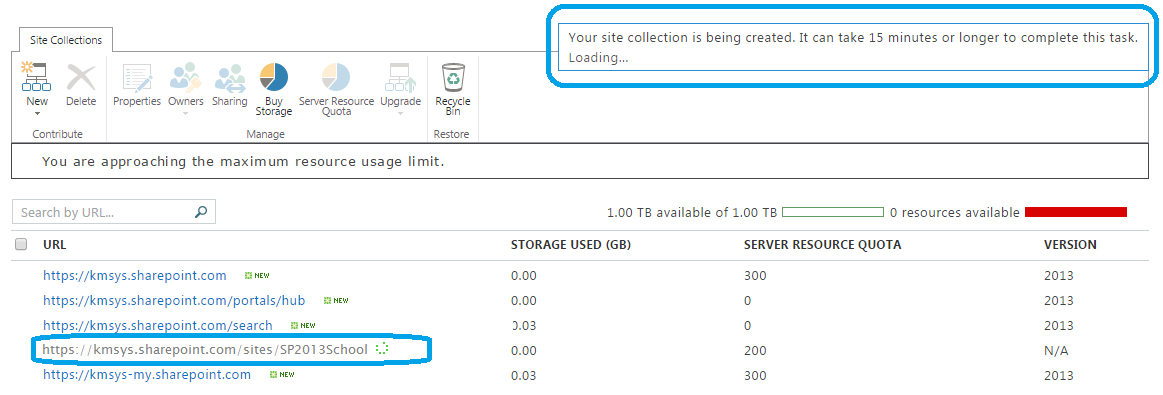
8. SharePoint process the new site collection and it takes few minutes
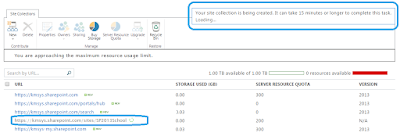
9. New site collection creation process will complete and back to SharePoint Admin Center
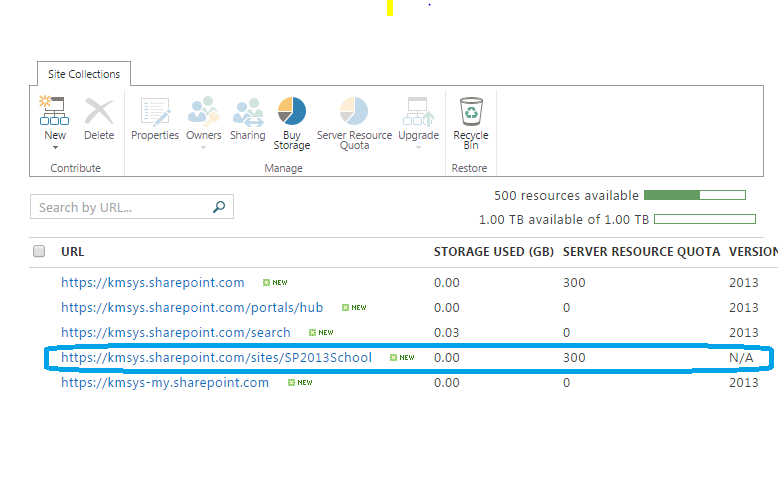
10. New site collection will be available in the list of site collection
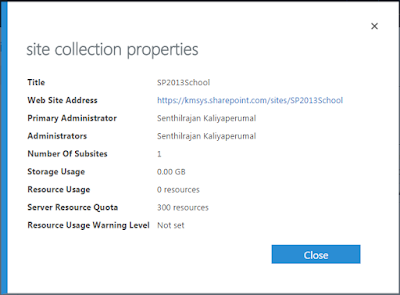
11.Click on newly created site collection URL to see all properties

12. Click on the web site address to see newly created SharePoint site
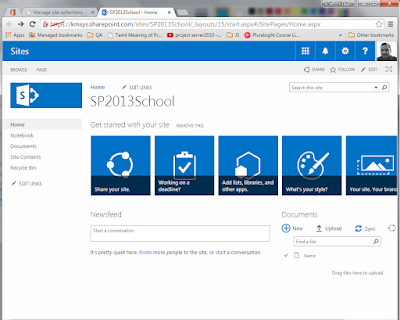
13. Newly created site loaded in new window.
Microsoft gives a sophisticated environment for maintaining all content at one place and make it available online all the time. SharePoint online is part of Office 365 suite. If you have SharePoint subscriptions enabled then you are allowed to create new site collections.
Find below the steps to create new site collection SharePoint online.
1. Login to http://portal.office.com
2. Once landed in Office 365, go to Admin Center and click on SharePoint
3. Once landed in SharePoint Admin center, click on New Private site collection
4. SharePoint begins with creating site collection input form

5. Enter the new site collection details as required

6. Enter the site collection administrator's name/id
7.Click on OK Button
8. SharePoint process the new site collection and it takes few minutes
9. New site collection creation process will complete and back to SharePoint Admin Center
10. New site collection will be available in the list of site collection
11.Click on newly created site collection URL to see all properties

13. Newly created site loaded in new window.

Subscribe to:
Posts (Atom)