Saturday, May 21, 2016

Get App Web and Host Web URL using jQuery

Find below the code sample of jQuery to get App Web and Host web URL.

$(document).ready(function(){
var spHostWebUrl=decodeURIComponent(getQueryStringValue("SPHostUrl"));
var spAppWebUrl=decodeURIComponent(getQueryStringValue("SPAppWebUrl"));
console.log("Host web URL  :"+spHostWebUrl);
console.log("App web URL  :"+spAppWebUrl);
});

function getQueryStringValue(paramName){
var params=document.URL.split("?")[1].split("&");
for(var intx=0;intx<params.length;intx++){
var urlParam=params[intx].split("=");
if(urlParam[0]==paramName){
return urlParam[1];
}
}
}

Friday, April 29, 2016

Create app catalog site in SharePoint online


SharePoint online will accept only one app catalog per tenant. Once the app catalog is created then all sites and site collection will use the same for apps management.

Find below the steps to create app catalog in existing SharePoint online site.

  1. Login http://portal.office.com
  2. Go to SharePoint Admin Center
  3. Click on Apps available in quick launch
  4. Click on app catalog present at right hand side(work space)

   5. Selection create new app catalog site option

6. Click on OK button
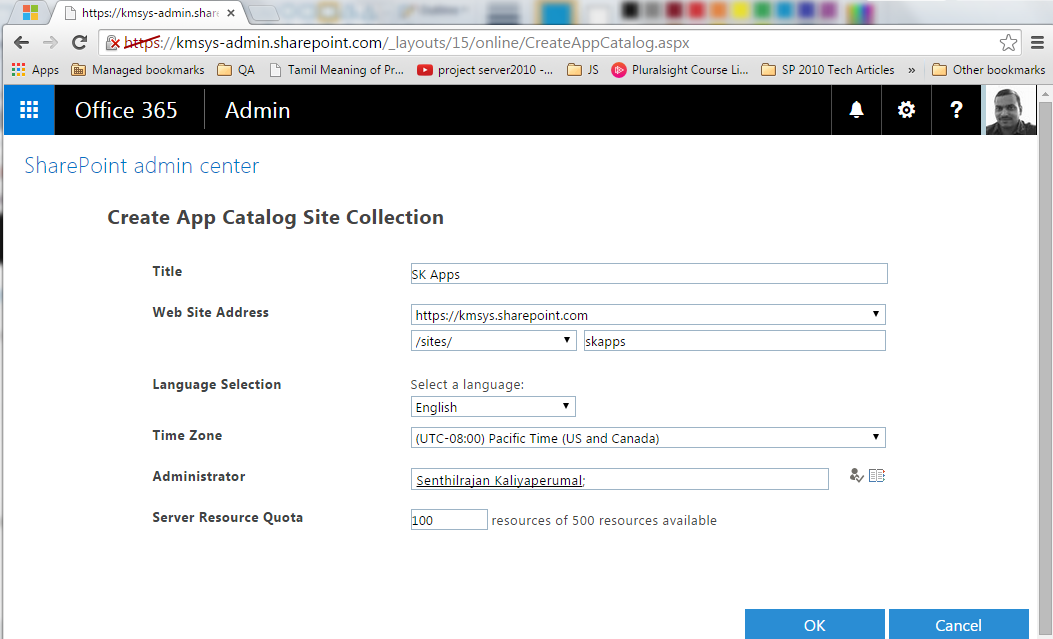
7. Enter new app catalog site details(similar to new site collection creations process)

8. Click on OK button
9. SharePoint online will take few minutes to process and provision app catalog site

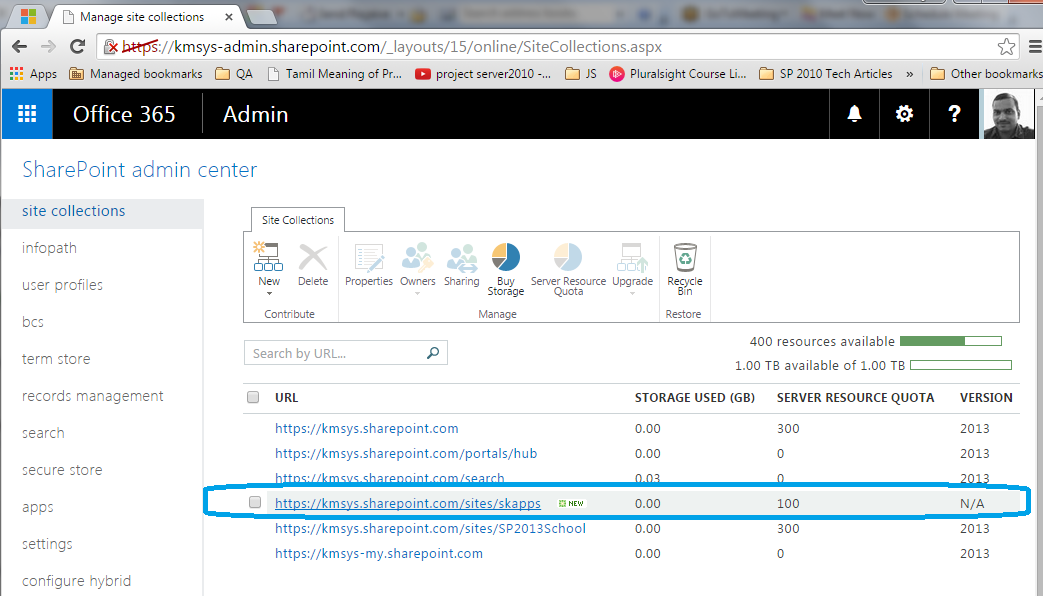
10.  New app catalog site is available in site collection list
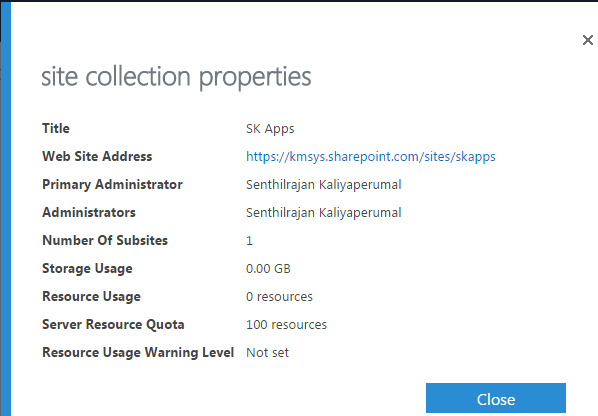
11. Click app catalog site url to see the properties


12. Click on web address to see newly create app catalog site

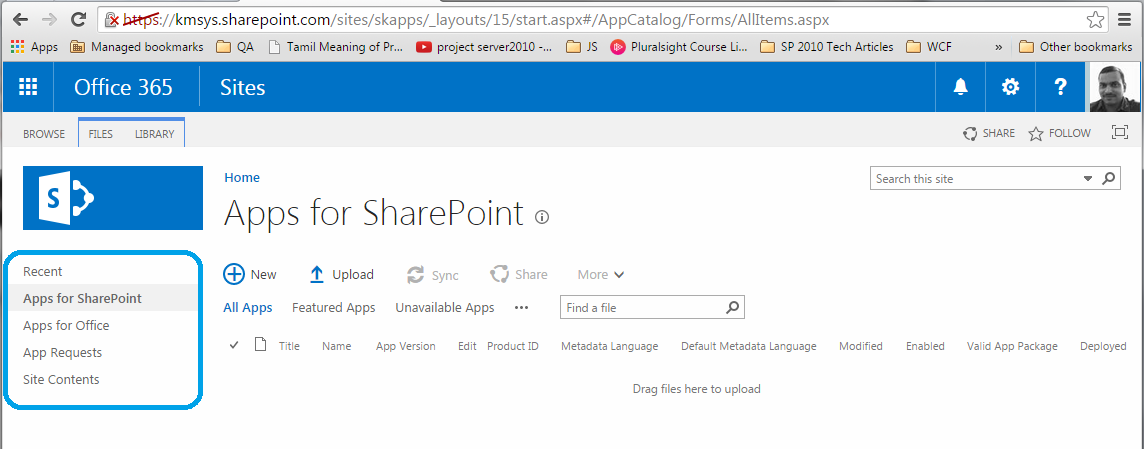
13. New app catalog site loaded 
14. Find different type options to import apps to your tenant


Thursday, April 28, 2016

Create New Site Collection in SharePoint Online

Create new site collection in SharePoint online


Microsoft gives a sophisticated environment for maintaining all content at one place and make it available online all the time. SharePoint online is part of Office 365 suite. If you have SharePoint subscriptions enabled then you are allowed to create new site collections.


Find below the steps to create new site collection SharePoint online.


1. Login to http://portal.office.com
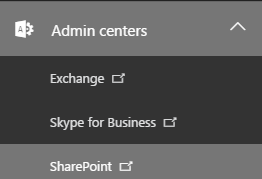
2. Once landed in Office 365, go to Admin Center and click on SharePoint


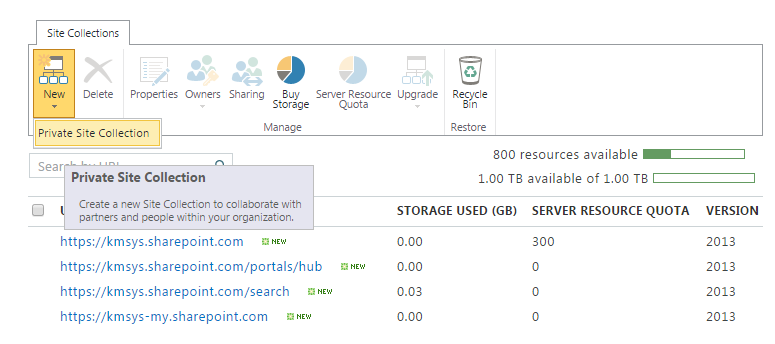
3. Once landed in SharePoint Admin center, click on New Private site collection


4. SharePoint begins with creating site collection input form


5. Enter the new site collection details as required


6. Enter the site collection administrator's name/id
7.Click on OK Button
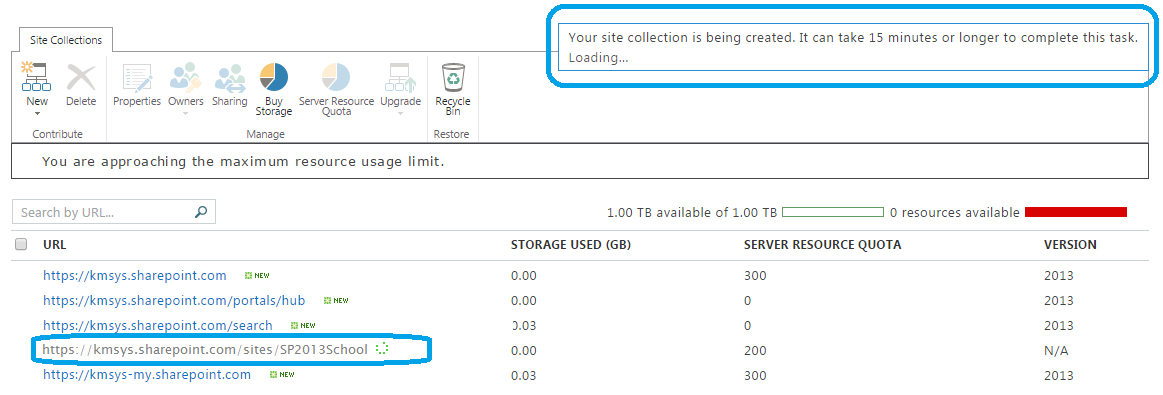
8. SharePoint process the new site collection and it takes few minutes


9. New site collection creation process will complete and back to SharePoint Admin Center
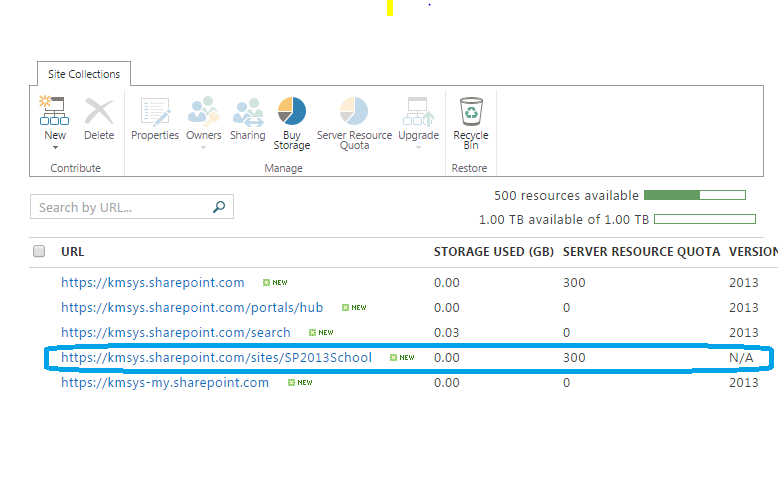
10. New site collection will be available in the list of site collection
11.Click on newly created site collection URL to see all properties

12. Click on the web site address to see newly created SharePoint site


13. Newly created site loaded in new window.


Wednesday, February 10, 2016

Get all sites where a feature is activated or deactivated

Get list of webs where either feature activated or deactivated in SharePoint at different scopes like web, site collection, web application and farm.

Below PowerShell script will provide list of webs(sub site including top level site) where specified feature is installed and not activated in particular site collection

Get-SPSite "http://kmsnet:5050"| Get-SPWeb -Limit All | Where-Object { (Get-SPFeature "12f73b57-1db8-4272-3d45-d8c1cc9f3d41" -ErrorAction SilentlyContinue -Web $_.Url) -eq $null} | Select Url


Below script will provide list of webs(sub sites including toplevel site) where specified feature is installed and activated.

Get-SPSite "http://kmsnet:5050"| Get-SPWeb -Limit All | Where-Object { (Get-SPFeature "12f73b57-1db8-4272-3d45-d8c1cc9f3d41" -ErrorAction SilentlyContinue -Web $_.Url) -ne $null} | Select Url

Note: If the feature object is null then those web(s) considered that feature is installed and not activated. If it is not-null then feature is installed and activated on the web.

Below PowerShell script will provide list of webs(sub sites including top level site) where specified feature is installed and not activated in all site collections from current SharePoint Farm

Get-SPSite –Limit All | Get-SPWeb -Limit All | Where-Object { (Get-SPFeature "12f73b57-1db8-4272-3d45-d8c1cc9f3d41" -ErrorAction SilentlyContinue -Web $_.Url) -eq $null} | Select Url


Below script will provide list of webs(sub sites including toplevel site) where specified feature is installed and activated in all site collections from current SharePoint Farm.

Get-SPSite –Limit All | Get-SPWeb -Limit All | Where-Object { (Get-SPFeature "12f73b57-1db8-4272-3d45-d8c1cc9f3d41" -ErrorAction SilentlyContinue -Web $_.Url) -ne $null} | Select Url

Below PowerShell script will provide list of webs(sub sites including top level site) where specified feature is installed and not activated in all site collections from specified web application

Get-SPWebApplication “http://kmsnet:5050” |Get-SPSite –Limit All | Get-SPWeb -Limit All | Where-Object { (Get-SPFeature "12f73b57-1db8-4272-3d45-d8c1cc9f3d41" -ErrorAction SilentlyContinue -Web $_.Url) -eq $null} | Select Url

Below script will provide list of webs(sub sites including toplevel site) where specified feature is installed and activated in all site collections from specified web application.

Get-SPWebApplication “http://kmsnet:5050” |Get-SPSite –Limit All | Get-SPWeb -Limit All | Where-Object { (Get-SPFeature "12f73b57-1db8-4272-3d45-d8c1cc9f3d41" -ErrorAction SilentlyContinue -Web $_.Url) -ne $null} | Select Url

Monday, January 25, 2016

Find Process Identifier (PID) for Application Pool

Developers and system administrators must know to find out the correct PID associated with application pool if multiple web sites are running different app pools on the same server. PID is more important when Administrator troubleshoots an issue/worker process or developers debug the code by attaching the correct W3WP process with visual studio.

There are four common methods available to find out the Process Identifier for application pool.
1. Using IIS user interface
2. Using Command prompt
3. Using Task manager
4. Using Process Viewer


Method 1: Using IIS User Interface


1. Open IIS
2. Select Server from Connection Tree
3. Select Features Tab
4. Double click on Worker Process available under IIS section
5. Find the application pool name and Process identifiers in tabular view


Method 2: Using Command Prompt

iisapp.vbs script needs to be used to retrieve the correct PID from IIS6 and Windows 2003 server. Find the details in below snapshot.

C:\Windows\System32>script iisapp.vbs

Command “appcmd” need to be used on IIS7 or above and Windows 2008 server or above to retrieve the correct PID details from server. The “appcmd” command had to be executed by passing additional parameters “list” and “wps”. Find the details in below snapshot.


Go to c:\Windows\system32\inetsrv>appcmd list wps

Method 3: Using Command Prompt
1. Open Task Manager
2. Go to Process Tab
3. Go to View menu and client on Select columns
4. Add PID(Process Identifier) and Command line
5. Click OK
6. Find the PID and application pool details in the updated view


Thursday, January 14, 2016

Activate Web (subsite) scoped feature in all existing sites and subsites using PowerShell


We ware asked to enable a new rule that site/sub site cannot be deleted if any document declared as record. Of course I have added  new web deleting event receiver and used a web scoped feature to register the event on web.

But we have more than 100000 sub sites in our SharePoint farm. And enabling web scoped feature for all existing sites became a risk and performance hit.

I had created two scripts to resolve this issue. 1. PS script to collect all site collection from a web application and store it in a XML file. 2. PS script will read the XML file and process the site collection one by one as we got a provision to pass number site to be processed at one time. It reduced the performance hit and trace issue if any feature failed to activate

PowerShell script to Fetch All Site Collection:

# This script to generate XML file which contains all site collections in web application

# .\1_GetsiteCollections.ps1 -url "http://kmsnet:5500/" 


param
(
[string]$url   # Web application URL

)

If ((Get-PSSnapIn -Name Microsoft.SharePoint.PowerShell -ErrorAction Stop) -eq $null )  
{ Add-PSSnapIn -Name Microsoft.SharePoint.PowerShell } 

#Start-Transcript
if($url)
{

[string]$filepath = $(get-location).Path;
# XML file generation code 
$ErrorActionPreference = "SilentlyContinue"
#$ErrorActionPreference = "Stop"

# Create a new XML File with config root node
[System.XML.XMLDocument]$oXMLDocument=New-Object System.XML.XMLDocument

# New Node
[System.XML.XMLElement]$oXMLRoot=$oXMLDocument.CreateElement("SiteCollection")
# Append as child to an existing node
$oXMLDocument.appendChild($oXMLRoot)
    $site = get-spsite $url
    $WebApp = $site.webapplication 
    $Count =0;
    try
    {
   foreach ($spsite in $WebApp.sites) 
   {
            [System.XML.XMLElement]$oXMLSystem=$oXMLRoot.appendChild($oXMLDocument.CreateElement("site"))
            $Count +=1;
       $oXMLSystem.SetAttribute("Count",$($Count))
       $oXMLSystem.SetAttribute("URL",$($spsite.Url))
            $oXMLSystem.SetAttribute("GUID",$($spsite.ID))
            $oXMLSystem.SetAttribute("Status","New")
                        
        }
        
        $xmlPath=$filepath + "\SiteCollXML";
        New-Item -force -ItemType directory -Path $xmlPath;
        $Filename = $filepath + "\SiteCollXML\SiteURL.xml"
        $oXMLDocument.Save($Filename )
        Write-host " Site collection file is generated : " $Filename
        
    }
     catch
    {
       # $Error; 
        $ErrorMessage = $_.Exception.Message
        write-host $ErrorMessage 


        $FailedItem = $_.Exception.ItemName
        write-host $FailedItem 
        
    }

}
else
{
Write-host "Please provide the Web Application Url...!!!" -foregroundcolor "Yellow"
}

PowerShell Script to process each site collection.

# .\2_EnableWebScopedFeature.ps1 -count 5 -Enable Y -FeatureId "12f73b57-1db8-4272-9d95-d8c1cc9f3d41"

param
(
    
    [int]$count =$(throw "Count is mandatory, please provide a value."), # No. of site collections to be processed
    [string]$Enable =$(throw "Pass y/Y to Activate the feature else pass n/N to deactivate the deature"),
    [string]$FeatureId =$(throw "Pass feature Id")
    
 )


Start-Transcript

If ((Get-PSSnapIn -Name Microsoft.SharePoint.PowerShell -ErrorAction Stop) -eq $null )  
{ Add-PSSnapIn -Name Microsoft.SharePoint.PowerShell } 

write-host "Successfully added SharePoint PowerShell snapins"

#$ErrorActionPreference = "Stop"
$ErrorActionPreference = "SilentlyContinue"
$curDir=$(get-location).Path;
$LogTime = Get-Date -Format yyyy-MM-dd_h-mm  
$LogFile = $curDir + "\Logs1-$LogTime.txt"  
$DocIDFile = $curDir + "\Log2-$LogTime.txt"  
write-host "Log file Location : " $LogFile


$filePath = $curDir + "\SiteCollXML\SiteURL.xml"

#write-host "source XMl file Path is $filePath "
write-host " Doc Id file " $DocIDFile 


$SiteCollectionsXML = [xml](gc $filePath)
try
{
    write-host "$count number of site collection requested to process";
    $currentcount = 0
    $DocIDcount = 0

$SiteCollectionsXML = [xml](gc $filePath)
$newItems=$SiteCollectionsXML.SiteCollection.site | where { $_.Status -eq "New"} 
    $node="";
    foreach ($sColl in $newItems)
  {
      if ([int]$currentcount -lt $count)
            {
        write-host "Start: Site Collection ";
        
        try
        {
        $currentcount = $currentcount + 1
         $node = $SiteCollectionsXML.SiteCollection.site | where {$_.GUID -eq $sColl.GUID}   
        $node.Status = "New"
        $objsite = Get-SPSite $sColl.URL;
        if($Enable -eq "Y" -and $Enable -eq "y")
        {
        $objsite | Get-SPWeb -limit all | ForEach-Object {Enable-SPFeature -Identity $FeatureId -Url $_.Url -Confirm:$false -ErrorAction:SilentlyContinue -Force}
        $node.Status = "Feature Activated"
        }
        
        if($Enable -eq "N" -and $Enable -eq "n")
        {
        $objsite | Get-SPWeb -limit all | ForEach-Object {Disable-SPFeature -Identity $FeatureId -Url $_.Url -Force -Confirm:$false -ErrorAction:SilentlyContinue}
        $node.Status = "Feature Dectivated"
        }
        
        $objsite.Dispose();


        }
        catch
        {
        $ex = $_.Exception 
        $node.Status = "Failed to Activate: $ex.Message" 
        Write-Error "Error on $siteURL details: $ex.Message" 
continue 
        
        }
        finally
        {
        $objsite.Dispose();
        $SiteCollectionsXML.Save($filePath);
        }
        
          }
    }
        $SiteCollectionsXML.Save($filePath)
}
catch
{
       
    $ErrorMessage = $_.Exception.Message
    write-host $ErrorMessage 

    $FailedItem = $_.Exception.ItemName
    write-host $FailedItem 
       
    $node = $SiteCollectionsXML.SiteCollection.site | where {$_.GUID -eq $Guid}
    $node.Status = "Error"

    Add-Content -path $LogFile -value ("`n" + "Site URL : " + ($SiteCollectionUrl)  + ' Site GUID : ' + ($Guid) + ' Error: ' + ($ErrorMessage) )

    $SiteCollections.Save($filePath)

}

Stop-Transcript

XML Output

<SiteCollection>
  <site Count="1" URL="http://kmsnet:5500" GUID="870c5dbb-c1b8-417a-89b3-c428369b7e45" Status="Feature Activated" />
  <site Count="2" URL="http://kmsnet:5500/SC1/" GUID="888b3fd3-48a1-41c5-b1c9-bd5b9102b29f" Status="Feature Activated" />
  <site Count="3" URL="http://kmsnet:5500/SC2" GUID="9f6f0d3b-1e02-42e0-8fbd-070b298576dc" Status="Feature Activated" />

</SiteCollection>


Tuesday, December 29, 2015

Set value to an Managed Metadata field


Managed Metadata is an extraordinary feature in SharePoint career path. It helps organization to structure all unstructured data and it is easy to use them.

The managed metadata field can be associated with List, document library.. etc

Also it has a feature that not used values(terms) can be deprecated instead deleting them permanently from centralized location. The deprecated terms can be used for future tracking. Normally if any MMD field associated with a TermSet then user can see only Enabled terms in the TermStore tree. It is a out-of-the-box feature that SharePoint will apply filter and display only enabled terms to the end user.

But deprecated term also can be assigned to a MMD field if necessary based on business need using Server Object model.

Find the code sample below which assign value to MMD field with enabled and deprecated term.

using System;
using Microsoft.SharePoint;
using Microsoft.SharePoint.Taxonomy;

namespace SetMMD_Field {

    class Program {
        static void Main(string[] args) {
            SPList lst = null; ;
            
            using (SPSite site = new SPSite(@"http://kmstechs/")) {
                using (SPWeb web = site.RootWeb) {
                  //  SPSecurity.RunWithElevatedPrivileges(delegate() {
                        lst = web.Lists["SK_Test"];
                        SPListItem oSPListItem = lst.Items.Add();
                        oSPListItem["Title"] = "Hello SharePoint";
                        TaxonomySession session = new TaxonomySession(site);

                        TaxonomyField taxfield = oSPListItem.Fields["Invalid_MMD"] as TaxonomyField;

                        Term InvalidTerm = session.GetTerm(new Guid(@"7dba48a0-89fa-4203-a265-e49ca3752ab7"));
                        string taxFieldInternalname1 = oSPListItem.Fields["Invalid_MMD"].InternalName;
                        oSPListItem[taxFieldInternalname1] = InvalidTerm.Name + "|" + InvalidTerm.Id.ToString();
                        taxfield.SetFieldValue(oSPListItem, InvalidTerm);

                        TaxonomyField taxfield2 = oSPListItem.Fields["Valid_MMD"] as TaxonomyField;

                        Term validTerm = session.GetTerm(new Guid(@"dca67b77-e4f4-4630-8785-e22518945ecc"));
                        string taxFieldInternalname2 = oSPListItem.Fields["Valid_MMD"].InternalName;
                        oSPListItem[taxFieldInternalname2] = validTerm.Name + "|" + validTerm.Id.ToString();
                        taxfield2.SetFieldValue(oSPListItem, validTerm);

                        oSPListItem.Update();

                   // });
                }
            }

            Console.WriteLine("done");

            Console.ReadKey(true);
        }
    }
}

Enjoy working with SharePoint :-)